Friday, August 28, 2009

Lucky Dog!

My Finish for Friday this week is a bit weak (it's not very big) but it's still a finish! We are babysitting for a cute little dog whose name is Truman. I wanted to practice some FMQ on my new machine and a few other tricks, so the boys and I made Truman a quilt.

I used Heat-n-Bond and a zigzag stitch to put his name on there. I wasn't overly impressed with the zig-zag stitch from Bernie, but I was only using Coats and Clark thread from Wally World, so that may have been the issue. She was missing stitches- actually quite a few of them, so I think it was operator error. These machines are famous for their even stitches. I am going to try a new needle and better thread next time and see what happens.

The fabric we used has little scottie dogs all over it. The gold for the back is a pillowcase, and the black is a sheet that I have used a LOT of. I am going to have to keep my eyes open for another black sheet.

I used black thread so that I could see what my FMQ looked like and where my problem areas are. I think I just have to work on being smoother (is that a word?) with my motion. I got a pair of those sticky quilting gloves to try with the next quilt. Moving that quilt around really made my hands sore and this is a small quilt.

The reason we are dogsitting is that Truman's owners are visiting with their brand new grandson! I couldn't very well make the dog a quilt and not the baby, now, could I? So this quilt will be for Elijah. It's fairly big- 40 x 50, so he will be able to use it when he is bigger.


(I sure hope I got the name right- I got that info thirdhand- and it came through TWO MEN before it got to me... not that most men are stupid or anything- they just tend to be wrong a lot.)


If you want to see more Friday Finishes, hop over to Lit and Laundry and see what everyone else has been up to! (Check out the cuddly fall quilt!)

Saturday, August 22, 2009

Another wedding and another Christmas quilt!

We had another wedding this weekend. (I have lots of cousins who have been doing the marrying thing lately. Silly kids.) This couple has been painting my late grandma's old place, which is right next door to my aunt, and they are going to live there. They painted the upstairs bathroom lime green!! I LOVE it! So I knew I could make them a really bright quilt- and here it is! I basically just wrapped a jelly roll around a charm pack of Merry and Bright, then used the last of the strips and a thrifted sheet for the floating blocks border. It turned out so cute that I wanted to keep it.


I even used one of the Bernie's fancy quilting stitches for the first time!

The theme of the gift was a "Tradition in a Box".

I wrote some little poems and attached them to each item. There are a couple of bowls for candy and popcorn, a DVD copy of "How the Grinch Stole Christmas" (the REAL one, not the Jim Carrey one) and a photo album so that they can take a picture of their family in front of their Christmas tree every year. (If anyone is interested in doing this and wants a copy of the poems, just email me or leave a comment and I will send you a copy.)

The wedding was last night and I was still up at 4 am yesterday morning hand sewing the binding! Nothing like leaving it to the last minute, right? The gal at the local quilt store laughed at me when I went to pick up some basting spray at 5:00 the night before the wedding- she was the same one who sold me the binding that I sewed on in the car on the way to the last wedding!

So I have now quilted TWO quilts with my new Bernina, and I love it more and more every time I use it. I actually enjoyed quilting this quilt, which is saying a LOT.

Friday, July 31, 2009

Finish for Friday

You're gonna want to grab a chair- I finished a quilt. As in, I actually quilted it!! This is because... dun! dun! dun! I got a new Bernina 430 and I really really love it and I can even quilt with it!! We are out of town for a wedding now, which brings me to my big finish for the week- it's a wedding gift! But I didn't really know the happy couple's favorite colors or their house's style so I just went with a Christmas quilt.

I made it a nice little matching storage case with a clear plastic window on the front for a page of instructions about how to store and clean a quilt.

With my fancy new machine I was able to use a funky stitch to attach the plastic. I did this really quickly this morning before we left so, shh!- don't tell, but it got a little crooked. (I am being sarcastic about the shh! thing. It is drunken sailor crooked, but when the quilt is in it you can't tell quite as much. I didn't have time to make another one, so, meh, whatever.)I like the idea of a zigzag quilt with no HSTs like Amanda Jean's tutorial, but I wanted pointy points all the way around. So what I did was add a white strip all the way around, except for the left side, where I added two strips. I had intended for this to be an oblong quilt, but ran out of the white on white polka dots, so Paul and I got real cozy with the seamrippers (yes, my wonderful husband helped me rip apart two sets of blocks, but he whined a lot so that kind of took away from the sweetness of it) and the quilt became square. (Well, sort of square. I won't switch sewing machines halfway through a quilt again.) If I do this again I won't put the extra fabric on the sides, but I would do it on the top and bottom.
I finished hand stitching the binding on the way here today. Which is one of my favorite ways to spend a car ride. I actually really like doing the binding. For this one, since there were... issues... with the "squareness" of the quilt, I used a white on white for the binding, too. Normally I like a contrasting binding, but for this quilt, well, not so much.

For the quilting, I did a double stitch in the ditch.

Where I had striped fabric, I cut it so that the stripes go the same direction.


I even made a label for this quilt! (The back is a flannel sheet.)
Just a shot of it hanging over the railing at the motel. You can see how the color is graduated from light to dark.

Unfortunately, the Friday finish over at Lit and Laundry is a sad one this week. I will let you head over and read about her kitty.

Saturday, July 18, 2009

Dude. I had to.


I wish it was a little more Boone's Farm-y, but it's not bad.
ETA: Wine snobs, don't read any further.
I added some Mountain Dew to it and now it's AWESOME!!

Thursday, July 9, 2009

The new additions to our family

I have been a bad blogger! I forgot to announce the birth of my beautiful new niece! Future Niece has finally graced us with her presence. She was definitely worth the wait. She had a bit of a rough start, but is doing very well now.

I have proof of her cuteness:

My mom and I were playing dress up with her already and we think she liked it. She is a sweetie and is already satisfactorily spoiled. (Just as a firstborn should be.)


My boys think their new cousin is "so cute" but were wondering if she would turn into a boy when she got bigger.


Mmm, probably not.


I have been promising my boys sock monkeys, so we finally did it! I have been trying to have something done so I can link up to Lit and Laundry's Finish for Friday, so we (I) labored away today (Thursday) and came up with these fellows:

The boys each picked out a pair of socks and this was what they wanted. Not the tie dye ones or cool striped ones. They wanted brown and black. (Are these really my kids?) So they got brown and black. Then they each picked out some button eyes, but Brady said he really really really wanted googly eyes on his, so we super glued some googly eyes right onto his button eyes.


Brady's monkey is named "Blackie". (Brady is a fairly literal child.)

And Lukey's unfortunately named monkey is "Poopy-head".


We will probably be renaming the monkeys tomorrow, especially since Lukey isn't supposed to say that word. The monkeys are snuggled in with their happy owners and hopefully not keeping them awake.


These monkeys were an absolute blast to make- talk about instant gratification! I used this tutorial, which was entertaining as well as informative. I do have 5 nieces, so maybe I will get to make some polka-dotted, stripey cute ones yet...

Now run over to Lit and Laundry and see what everyone else finished up this week!

Lit and Laundry

Wednesday, July 8, 2009

Vintage Sheets

I have been seeing a lot of pretty vintage sheet quilts all over in "blogland" lately. I love these and since I love to "thrift", I had already bought a few sheets. When we go out of town, I always look up the local thrift stores and make Paul take me to them. (Better yet, I ditch Paul somewhere and go on my own.) My collection is getting bigger now, but I have yet to make a quilt entirely from vintage sheets. I have used them in other quilts, but I basically just view them as more fabric. I also have been buying old clothes when they are cheap enough. I have a little litmus test: if this was a fat quarter, would I buy it? If the answer is yes I will pay up to a dollar for a shirt or pillowcase or set of napkins or what have you. Any more than that and I will usually leave it there.
This sort of quilting makes me think of the "old ways". My great-grandma, Nanny, was a very prolific quilter. She made what we would call utilitarian quilts and gave them away to anyone in the community who was having hard times. When she was older, she suffered from macular degeneration and was considered legally blind. Her quilts showed it. However, she didn't let a silly thing like blindness stop her! She kept sewing away even if the seams didn't always get caught. I have one of her quilts and even though my mom went through it and tried to fix all the open seams, there are a few areas that are going to need some attention. Nanny used old clothes- polyester, cotton, blends, whatever she had on hand. People would bring her bags of old clothes and she just cut them up and sewed them right up into quilt squares with no thought to color placement at all. Christmas fabric, Halloween fabric, baby prints- everything went together.
Nanny tied most of her quilts, except for the "nice ones" which she would hand quilt. I can remember playing under the frame in her living room- her house was tiny and when the grownups were tying off a quilt there was literally no room to walk around the quilt. If you were on the "wrong side" and wanted to go to the kitchen or bathroom, you had to go out the front door, around the house and then go in the back door. I love that this is my heritage- making do with what you have, making old into new, giving a new life to something destined for a landfill.
Here are some pictures of my vintage sheet stash. There are some pillowcases and tablecloths in there too. The cabinet that I store them in is also my ironing station and it was given to me by my dad's mother. One of my uncles made this in shop class before I was even born. They just don't make things like they used to! Our table which is only 2 years old is in worse shape than this cabinet!
I pulled some of my favorites out and took pictures of them. Since I am poor (lazy) and didn't have (want to run downstairs and find) a quarter, I used a clothespin to show scale.
Can you see the polka-dots in this one? They don't show up true- they are pink like the flowers.
This may be my very favorite.
It says "Oleg Cassini" on it. I googled that but can't find anything that tells me about his vintage bedding. All I find are references to clothing. This is one that will be hard for me to cut into.
I like florals.
I am drawn to butterflies, too. This one is perfect for fussy cutting.
I have three of these- each one is a bit different, but they obviously came from the same line. I have a couple pillowcases in similar patterns also. I plan to cut the squares out and use them basically as a charm pack. The blue ones will go into the centers of some "squares inside of squares" blocks for the back of my quilt for my bed.

This pile is a set of homemade curtains and a "spread" as they called it at St. Vincent DePaul. I got a TON of fabric for $7. I am going to use it as a kind of stack and whack, but instead of squares I will make large Dresden plate type wheels and applique them onto alternating blue and green solid squares. I have some linen tablecloths that match the colors and will use those. I am going to end up with a VERY cool, wild quilt top for around $12.

.This sheet is not very old, but it was so cute I couldn't leave it there.

This floral is "Aunt Grace Ties One On" (I think) and it is a new fabric, as is the black and white polka dot. The green and yellow are vintage sheets, though. Don't they look nice together? I have no qualms about mixing new and old.

These are newer sheets, also, but they are cute. The green whales on pink is a Tommy Hilfiger sheet. It is a bit worn, but I will cut around those parts. Once again, these were too cute to leave there.

The orange and pink sheet is a vintage find, but the white with polka-dots is newer. I got the pink and orange (fitted and flat) from an estate sale down the block from my house and the pink one was a dollar at Goodwill. The pinks match perfectly. (The white and pink one is a Disney sheet and has a ruffle at the top with Baby Minnie on it.)

This blue and yellow pile is all shirts, pillowcases and a set of napkins. I want to make this quilt as sort of a tribute to Nanny and will use her favorite quilt square (churn dash) but I will make it wonky so that it will reflect my style as well. I will use a thrifted white sheet for my setting fabric so this will be another VERY inexpensive quilt top. I am still collecting fabrics for this one.

I hope this post inspires someone to think outside their fabric box. I do buy designer fabric, too, but "reclaiming" fabric makes those pricey fat quarters and half-yards go a lot further. Just don't start shopping at MY Goodwill. Or if you do, leave some good stuff for me.

Monday, June 22, 2009

I'm gonna call this one a learning experience!

First off I want to make clear-this quilt is not completely my design. I "copied" (sort of) one that Kellie made and anything that looks awkward about my quilt is NOT her fault. I did eventually buy a pattern from her, but started this before I got it. If I had waited I am sure I would have much prettier flowers and butterflies. I feel a little funny ripping off someone else's design so I wanted make it clear that she provided the inspiration for this quilt!

I had a great experience purchasing from Kellie and there was the added bonus of the exchange rate working in my favor. I got a deal when her site converted my U.S. money to A.U. money! (Is that the proper initials? For Australia?) Her pattern was very clear and included a large section of paper with the placement of the little pieces on it. Sometimes you get a pattern and you have to tape together some smaller letter-size sheets of paper, but Kellie's was great. Now that I have the proper pattern, I will make one of these and keep it! For ME! I will use the pillow pattern and just convert it to a quilt.
So anyway, Future Niece's first quilt from her "Auntie Leesee" is finished! And it has been put into her mama's care. Before she was born even! I didn't have it done in time for the baby shower, but I did get it done before she was born, so in my book, that's on time! I used these colors because my brother has always loved purple and green- he used to have big lifted-up "monster trucks" and he would paint them one of the two colors. Or both. Well, after I gave this to my SIL, she said it was one of her favorite color combos, too. So that was cool.
This was my first try at a lot of things- free-style handquilting (which I think I made up), raw edge applique, bias cut binding and a scalloped border.
On here you can see how I just sort of started quilting "straight" lines (without marking them). At first I liked how wavy my quilting lines are, then I didn't like it, and then I switched back to liking it. It is basically what I had in mind, but after a while, I wasn't sure if I liked it in real life. I have decided that I do. I said it was "organic" and my mom laughed at me. Then all day she kept teasing me about hypo-allergenic quilting or something. I take so much abuse from my family. At least Sherry understood me.

I liked the raw edge applique, although I am a bit leery of how it will wash.

I LOVED bias cut binding and will now switch to that. Up until now I have always just done a straight cut. Straight cut is faster, but this looks and handles SO much nicer!

The front:

I just realized I took the picture by the one straight seam in the whole binding. Nice.

The back:

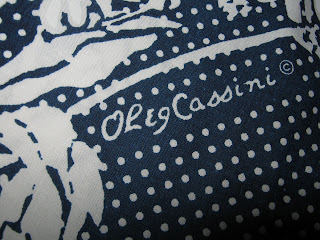
The white with purple polka-dots is a "vintage" sheet. (Or maybe it's just an upcycled sheet. I don't think it's very old.)

Yeah. And then. Scalloped borders. Right. Um, won't be doing that again. Not for a while. A LOONG while. It is pretty, and it turned out... well, it turned out ok.

Some areas (by that I mean ONE) even turned out pretty good.

And Future Niece herself could have done a better job on some of these BLANKETY-BLANK-BLANK pointy-inside-corner-things! From inside the womb!

I have posted this picture so that I may inspire (fear into the hearts of) those who are possibly considering making (a BIG mess of) scalloped borders!! It's a great way to finish off a quilt (if you are masochistic) and gives it a little extra charm (and some arthritic lumps). So if you want to try taking your binding and border making skills to the next level (and by that I mean if you are INSANE) go ahead and try this. (Just don't do it my way- which is trial and error, mostly error.)

Someday I will write a proper post about how (not) to make a scalloped border.

In the meantime, I would suggest you make a (slightly) wavy border and call it good.