Showing posts with label bags. Show all posts

Wednesday, December 22, 2010

Kindergartener Tote Bag 2010

(Some of you might remember this- at the time my children were suffering from the common childhood ailment "Koolaid Moustache". We are having another fairly serious bout of it this year.) 

The bag was so big and sturdy that you could put a kindergartner in it so I named it the Kindergartner Bag. All of my teacher friends/family loved it and wanted one, so I decided it would be my go-to gift for all teachers- even non-kindergarten teachers. 
(You never know when you'll have to carry around a little kid in a giant tote bag.)

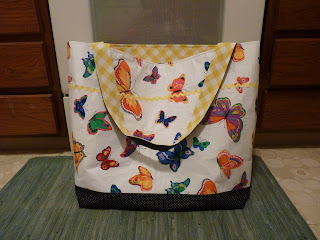
Here is this year's "kindergartner bag":

The teacher has this butterfly print in her classroom as a curtain and a pillow so I know she likes it.
Her favorite color is yellow. The lining on this is a vintage sheet.
Added yellow rick rack too- fun! And it helps stabilize the interfacing where I had to piece it. These bags are so big that I have to piece the interfacing before I can use it.
This bag has 3 pen pockets and a cell phone sized pocket on top of a book/folder pocket. There is also a book/folder pocket on the other side. Brady chose a "Where's Waldo?" book at the used book store to put inside the pocket.
 Stats: 
28" wide on top
20" tall
20" wide on bottom
8" deep

I feel like I am a bag lady instead of a quilter lately. I have gone through two BOLTS of interfacing since Thanksgiving. I'm gonna have to see about getting that stuff wholesale!

Thursday, December 9, 2010

Pictures! Of Bags!

Here are pictures my big bag order. One of my friends ordered 7 bags from me. She owns a salon and is giving each of the stylists, the receptionists and the massage therapist a tote for Christmas. As if that isn't nice enough she is filling them up! Lucky ladies! I want one!

I quilted the interiors and exteriors to heavy interfacing individually before I sewed them together so the bags stand alone. Which is saying a lot- these bags are BIG.
LARGE bag- for massage therapist to carry blankets to and from work.

All the pockets in the different bags are the same- behind are pen pockets, outside is a pocket that would hold a magazine or papers 

other side- divided into 4 sections
Exterior- Amy Butler Lacework with an orange lining
Interior- fussy cut flowers for pen pocket (this one bag is different- the pen pocket is outside the paper holding pocket)
Exterior fabric is Nicey Jane- Hello Roses in Olive. Everyone that sees this LOVES this fabric. I do too- am working on one for myself made from this same print.

The bags for the stylists. The shop colors are brown and turquoise. Really cool!
All seven bags! I am pretty proud of them- they turned out really nice. YAY! Glad to be done with this.  

Monday, November 15, 2010

I used a pattern!! An Amy Butler pattern, no less!

 Due to being absolutely miserable with The Plague or The Bloody Snotty Death Cough or whatever it is I have, I have been reeeeeally lazy for the last week. I think Child Protective Services should come and remove my children from this unsafe, unsanitary environment. 
(I wonder if I called in a complaint if they would figure out it was me...?)

Anyway, as I was languishing on the sofa this weekend, the library called and said they had a book at the front desk for me. I put a sweatshirt on over my crusty a-leper-wouldn't-wear-them pajamas and brought my germy self down there to see which book it was (since I had forgotten what all I had requested). It was Amy Butler's Style Stitches!!  I was so excited to get my greedy little hands on it.  Almost made me feel better for a second.
Almost.

I have a friend who recently started working at the library and she has been amazing me with the books she can find. I do catalog searches and come up with nothing, but if I ask her she can almost always find them for me. So: make sure you check with the librarians at the front desk if you can't find the book you want in a catalog search. They may be able to get it for you.

This was the first time I had ever actually used an Amy Butler pattern or read one of her books, but I love the fabric and I wanted to see what the patterns were like. (Plus I think I need to learn to use patterns. And plus her bags are really cute.)
The book is beautiful. It could be a coffee table book. The photography is gorgeous, and the pages almost have a scrap-booked kind of look to them. It is well laid out and has a ring binding so you don't have to worry about it falling apart. The pattern pieces are all full size and are in a cute little folder at the back of the book.

I have not used patterns very many times (for anything, not just bags) so some of the terminology was confusing to me, but I managed to get the first bag in the book- the Cosmo bag- finished during the past few days. I have seen online where people made this bag in a sitting, but it took me much longer. Just the cutting took hours. Once the cutting was done it really seemed to go quickly. The projects are arranged easiest to hardest, and this was the first one in the book. EEK! It was a little tricky I thought. I definitely would not have been able to make this bag if I was a beginner. I am a bit nervous about tackling one of the harder ones.

The book has you cut all the pattern pieces out, then the fusible interfacing, and then you iron the interfacing pieces to the fabric pieces. If I make another one, or any of the other bags with lots of pieces like this, I will iron the interfacing on to the yardage in big chunks and THEN cut out the fabric pieces which would save a step. It would use a little more interfacing, but not much, and the time saved would be totally worth it.

hanging (empty)
sitting (empty)
I also wish the book had more drawings to illustrate the individual steps. I was quite lost a few times, but that could be partly due to me not bringing my A game this week. I am going to make a stiff bottom insert and see if that helps the bag hold it's shape more on the inside.
 I did not divide the pockets as the book showed. I wanted to be able to put papers or magazines in the inner pockets so I offset the stitching line to one side or the other. I also added some smaller pockets behind the large ones. Not crazy about the pockets this bag has, but that's a really easy fix.
I have to rip apart the top stitching that is on the inside of the handle. It doesn't look nice, and I didn't catch everything I was supposed to. This is the last place you sew after you flip the bag right side out, and it's got a lot of curves so it's kinda tricky.

Overall, I very much like the book and will buy it. There are some other really cute patterns in it and I learned a LOT making just this one bag.
Friday, October 29, 2010

Finish for Friday

This week I have been playing around making myself some bags. These are not for my big order. I am just trying to teach myself new ways to construct things. 

I hate to use patterns. My mind just does not work like other people's minds, I guess, so I have to work things out in my own head and make them that way.

 This purse/bag took me about 5 or 6 hours. I would have been faster, but I started with no concrete idea and kept changing my mind about how I wanted it to look. I definitely learned a lot and the next one I make like this will be much nicer. However, I am happy enough with this one that I will carry it.
I think I might add a vintage jeweled pin or a scrappy gold fabric flower to the yoke.
Used a magnetic clasp and lined it using the same fabrics from the outside of the bag, but reversed their positions
Shirred the sides and bottom
The gray fabric is a $2/yd one from Walmart and the flowered velvet is a skirt from Goodwill. Stupid skinny size 4 people. Their clothes just do NOT have enough fabric.
My other sewing finish this week is something for my friend's grandfather. The arms of his couch are worn through, although the rest of it is in pretty good shape. We found a couple coordinating fabrics and made reversible arm covers for him. Well, actually my friend found the fabric and I made the covers. I told her she could tell him that she made them and take the credit but she said she doesn't want anyone thinking she can do stuff like that. I can definitely see her point.

I am pretty happy with how they turned out and they really weren't hard at all. 
Now, don't go telling anyone that I know how to make these. I'll deny it!

I am linking up to Lit and Laundry's Finish For Friday. Check it out!

Friday, October 22, 2010

One tote down, six to go

 In case you missed my last post, I am making 7 bags for an order for a friend. Today I finished the first one. 
(I want to keep it.)
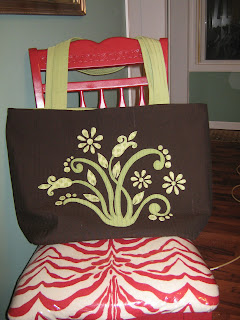
I wish the green would show up more true. It's a very limey green, but on here it looks almost minty. I need a better camera or something. Or better lighting in a better house. Or something.

I wanted a really stiff bag that would be easy to fill so I used a heavyweight interfacing (Peltex? I think it was called?) and quilted it about a half an inch apart before I cut out the front and back. I did the quilting after I did the applique. It helped, but I only used a lightweight fusible interfacing for the lining and next time I think I will use the heavier weight for both. I would like the bag to stand up on it's own, which is asking a lot of a bag this size. Speaking of, it is:

27" across on the top.
19" across on the bottom
8" deep
17" high
The straps are about 3 ft long

Those measurements have no rhyme or reason, beside the fact that I cut it out to use the entire piece of brown upholstery fabric that I had. This was as big as I could get it- trust me, there were barely some shreds of waste. 

I only put 3 pockets inside- one for pens (or scissors), one that would be good for holding a cell phone and one that is pretty large. It holds a magazine with room to spare.
This was my first attempt at a loop/button closure. Notice the marking pen on the bag. Sign of a true seamstress, that. Or, no wait, that's sewing through your finger, isn't it? Never mind. I'm just a hack.

Next post: Mario and Luigi costumes. No sewing. Did you know you can spray paint clothes?

I am linking up to two parties this week. I actually made myself finish this today so I could get in on the fun. These parties are good for me. 
Lit and Laundry hosts Finish For Friday, which does not have to be a sewing related finish, and Amylouwho hosts a Sew and Tell every Friday. Both are super fun to cruise around. Now, go! Enjoy!

Monday, October 18, 2010

In the works

Please excuse the crazy glare. When I started blogging I thought my photography skills might improve as my quilting skills did, but it turns out you have to actually work at things in order to get better at them.

This is for a set of bags I am making for a friend. I have an order!! I am sort of easing my way into making this sewing thing a possible money-making gig. My friend owns a business and wants to give her employees each a custom bag for a Christmas gift. (Awesome boss, right?) I took her business card design and tweaked it up quite a bit and came up with this, which is something I think I can applique with a modest degree of success. Now I just have to incorporate it into a bag design. Oh, yeah, and make 7 lined reversible bags... with pockets... and maybe zippers? Nothing like jumping in with both feet!

Saturday, January 16, 2010

The Kindergarten Bag

Here are some more pictures of the "Kindergarten Bag" being modeled in my home. I had posted about it before I sent it to the recipient, but thought I would give an update. This bag is the one I sent to Brady's kindergarten teacher for Christmas and she sent a note home saying that she loves it and uses it all the time. YAY! It's awesome to hear things like that. She also said she gets lots of compliments when she is using it, so that was nice to hear, too.
This tote is called a "Kindergarten Bag" because you can put a standard sized kindergartner in it and carry him/her around for an indefinite amount of time. (The bag won't rip or tear, but you may.)
Here the bag is shown holding an actual kindergartner. Note the smile and general air of well-being evidenced by the child. This happy feeling is DIRECTLY caused by the fact that he is IN A BAG.
The Kindergarten Bag can also hold a pre-schooler as evidenced here. (This child does not actually have a deformity. The discoloration on his face is caused by the quite common childhood ailment "Koolaid moustache"*. )


*This is not a life-threatening disorder and can usually be managed with soap and water, depending on the severity of the case. The child with the ailment may not even realize he/she has it until someone mentions it or they see themselves in a mirror, upon which they will demonstrate surprise and possibly dismay. To prevent this ailment from recurring the parent may choose to have the child drink his juice, punch or koolaid with a straw. Although that will present it's own set of issues.


Friday, January 15, 2010

Finish For Friday- applique bag

Another Finish For Friday!! I am 3 for 3 this month!
If you want to join in on Finish For Friday, head over to Lit and Laundry and join in. It doesn't have to be a sewing finish- it can be anything.

I have no quilt finish this week, but I did get a bag done. This one is for my cousin and she has been waiting a while for it.

I am slowly getting better at these as I make more. Each time I make one, I tweak something and make my pattern better. This time I made a stiff "board" for the bottom on the inside. I just used the lining fabric, 2 thicknesses of the interfacing and then quilted it with close lines. It really helps the bag hold it's shape. The bag is very large (18" wide x 16" tall x 8" deep) so it tends to be a little floppy. I like the bag to stand on it's own, so I use the heaviest interfacing I can find. Another tweak I made this time was in the large pocket. I put a layer of interfacing in the fabric for the pocket, which keeps it from sagging open.


I have been admiring Joanna's very recent applique art quilt and also a less recent one. I liked how she mixed brights with brown, so that is what I did for my applique on this bag. I liked how it turned out so much that I am making myself a bag like this one, too.


I love the brights and brown together, but would not have come up with that on my own, so thanks, Joanna!

Thursday, December 17, 2009

I've been making BAGS!

I have been on a bag kick lately. I have been making Big Giant BAGS!I started out making a few because I wanted them for groceries. Well, I found a half a dozen on sale at Walmart for a DOLLAR each so I snapped those up. They weren't quite as big as mine, but they rounded out my collection nicely. So now I have enough bags to go to the grocery store, and when they ask if I want paper or plastic, I can answer, "Fabric, please!" :0)


Anyway, it was fun, so when my sister asked me to copy one of my "real" purses, which was just a storebought purse/bag thing, for her, I thought I would give it a go. Here is the real purse- for some reason I can't get it to load right so you all will just have to tilt your heads. I have had this for years and I love it, and always get lots of compliments on it, but it's starting to wear out.


This is the applique that I have sewn to the bag fabric for the new one. The owl applique turned out awesome. It would have been much cheaper just to go buy the bag, but they don't sell them anymore, and plus the one I am making is better made. I may end up making another one so I can retire my poor raggedy worn out one.


I will post pics when it is completely done. I have to make the straps and then sew it together so maybe a few hours of work left on it.


Emboldened by my success I decided to make one for Brady's kindergarten teacher for Christmas. He helped me a little so I can say it's from him. (He likes to peel the paper off the back off the applique pieces.) I made it HUGE- here it is sitting next to a paper bag, so you can get an idea of the size. My cousin is a pre-school teacher and she said that all teachers would love a huge bag to carry all the crap they have to bring in. This should fit the bill! LOL!


I designed the applique myself, just tried to make it bright and fun for kids, but not too kiddish to where she couldn't use it elsewhere. I think I succeeded. She could haul this to the beach or grocery shopping or whatever. My applique is definitely getting better as I practice more.

I think it turned out really cute. The lining on this one was a little loose, and I have not had that problem yet, but I think it is because the bag was SO big and I didn't quilt it much.

These are really fun to play with. I have lots of friends who want them so I am going to be busy making bags for a while. I do have a new quilt in the works, made COMPLETELY from vintage sheets, but no pics yet.